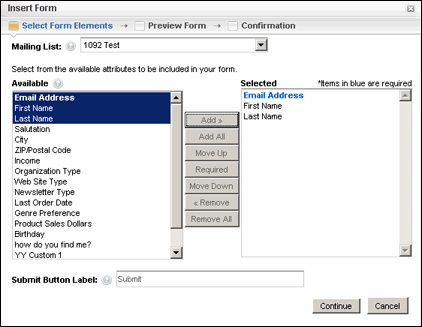
When you add or edit a form, you can choose a variety of settings related to that form in the Insert Form dialog box. This dialog appears:
To add a form
Click the Insert Form button

To edit a form
Double-click the Form button located above the form.

The options are the same for adding or editing.
The Insert Form Dialog

The Insert Form dialog contains three pages. You can navigate from one page to the next (or back) using the following methods:
1. When you are finished with a page, click the Continue button at the bottom of the dialog to go to the next page.
2. The page names at the top are also links that will take you to that page.

Page 1: Select Form Elements
To add elements to the form
1. Click the Mailing List drop-down list, and then choose the mailing list that contains the attributes you wish to add as elements to the form.

2. In the Available box, click an attribute, and then click the Add button. Do this for each attribute you wish to add to the form.
To designate an element as a required field
In the Selected box, click the element, and then click the Required button.
NOTES

TIP Keep your form simple, and keep the number of fields to a minimum. Reducing the number of fields results in much better completion rates. However, make sure you include any fields that are crucial lead qualifiers.
To change the label that appears on the form's Submit button
Edit the text in the Submit Button Label field.
To save your changes on the Select Form Elements page and continue with form creation
Click the Continue button.
Page 2: Preview Form
On the Preview Form page, do one of the following:
1. If you are not satisfied with the form, click the Select Form Elements link to return to that page, make your changes, and continue.

-or-
2. If you are satisfied with the form, click the Continue button.
Page 3: Confirmation

On the Confirmation page, do one of the following:
1. If you want the user to be redirected to an existing web page after clicking the Submit button, select Redirect to another page, and then type or paste the URL into the adjoining text field.
NOTE If you do not specify https:// or http:// at the beginning of the URL, http:// is automatically used.
-or-
2. If you simply want to display a confirmation message after the user clicks the Submit button, select Display confirmation message, and then type your message in the text field below.
3. When you are finished, click the OK button.